A Creator’s Guide to Record from DreamCams Without Technical Hassles
If you’re creating content through webcam-based platforms, your sessions can be powerful, valuable, and one-time-only. That’s why many digital creators, educators, and streamers now choose to record from DreamCams to preserve, repurpose, and protect their live content. Whether you’re just starting out or looking to upgrade your setup, this guide walks you through how to record your DreamCams sessions like a pro.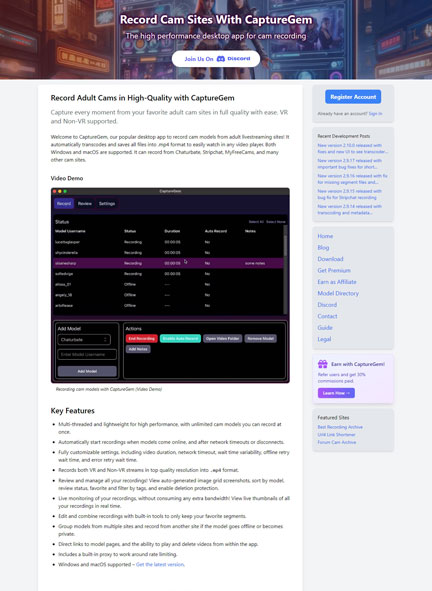
Why Recording Live Sessions Is a Must
Live interactions are engaging and unscripted, but once they’re over, they’re gone—unless you hit record. That’s where a dedicated recorder comes in. Saving your sessions allows you to:
-
Repurpose content for other platforms like YouTube, TikTok, or private courses
-
Review and improve performance
-
Archive educational or coaching material
-
Save personal or business-related conversations
With a good recorder in your toolkit, your content becomes reusable and your creative process more efficient.
Features to Look for in a DreamCams Recorder
When it comes to recording webcam content, the difference between generic screen recorders and specialized tools is massive. A professional DreamCams-compatible recorder should offer:
-
Full HD or 4K video capture
-
Audio-video sync accuracy
-
Low CPU usage during recording
-
Adjustable resolution and frame rates
-
Output options including MP4, MOV, or MKV
These features ensure your output looks polished and ready to publish without needing hours of editing.
Step-by-Step Setup Process
If you’re ready to begin, here’s how to set up a recorder designed to handle DreamCams sessions:
-
Install the Recorder
Download the software and complete installation. Stick to official or verified sources for security and compatibility. -
Configure the Settings
Open the software and choose video resolution, microphone source, camera feed, and preferred video format. -
Test Before Going Live
Do a short recording—around 30 seconds—and playback to ensure both the visuals and sound are clean and in sync. -
Start Your DreamCams Session
With everything in place, begin your session and click the record button to capture in real time.
Need additional visual guidance and troubleshooting tips? Head to:
https://www.capturegem.com/guide/record-from-dreamcam
Mistakes to Avoid While Recording
Recording should be simple, but small mistakes can cost you good footage. Avoid these:
-
Forgetting to check mic input—use a quality external mic
-
Recording in a cluttered or dark background
-
Running out of disk space mid-session
-
Ignoring software updates that improve performance
A few minutes of setup can prevent hours of frustration during post-production.
Who Should Use DreamCams Recording Tools?
Recording DreamCams isn’t just for influencers. Here’s who benefits:
-
Tutors and educators who need on-demand lessons
-
Fitness and lifestyle coaches delivering visual demonstrations
-
Reviewers and product testers capturing live demos
-
Consultants and therapists recording private sessions (with consent)
-
General users who want to archive meaningful interactions
If your work involves live digital engagement, you’ll benefit from professional recording.
Tips for Better Recorded Sessions
Once you’re recording, a few extra steps can improve your overall quality:
-
Position your webcam at eye level
-
Use front-facing light for a more professional look
-
Keep your recording environment noise-free
-
Label your recordings with dates and topics
-
Trim unnecessary footage before publishing or storing
These small details make your content cleaner, easier to edit, and more engaging to viewers.
Conclusion
Choosing to record from DreamCams is a smart step for anyone working with live, webcam-based content. With the right software, a bit of planning, and a focus on quality, you’ll have recordings that are not only useful but professional enough to publish across any digital channel.
For full setup guidance, pro tips, and recorder recommendations, visit the official help page:
https://www.capturegem.com/guide/record-from-dreamcam